• 15 Apr

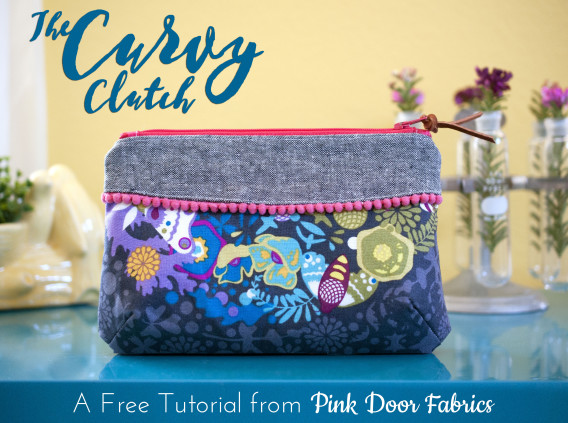
    The Curvy Clutch – A Free Pattern and Tutorial

    Posted under Free Patterns, New Fabrics, News, Tutorials, WIP Wednesday

    DSC_0142_Blog

    Over the last few days, an idea has been bouncing around and I quickly set to work. I sketched ideas, drew up templates, and quickly got down to sewing. We were given some advance sample fabric of Alison Glass‘ new line, Ex Libris, and oh my goodness, it’s gorgeous! We expect to see it in our shop very, very soon!

    On with the post – I’ve written up a tutorial for the Curvy Clutch to share with you all! We love to create, and know that many of you do, as well. So here we go!

    Download your own copy of the Curvy Clutch pattern and tutorial here.
    Pink Door Fabrics - The Curvy Clutch Tutorial and Pattern

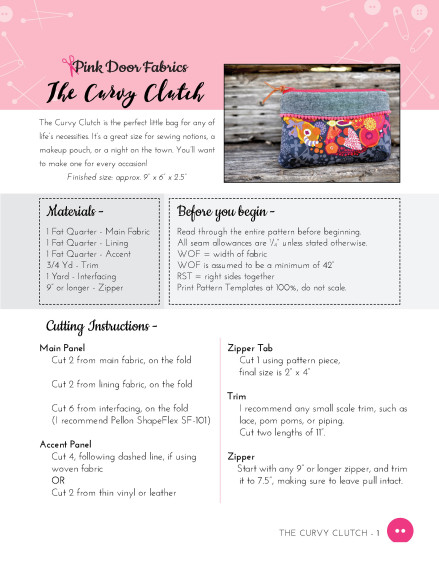
    Let’s begin on your Curvy Clutch! You only need a Fat Quarter of all three fabrics used. You’ll also need some trim (3/4 Yard), a 9″ or longer zipper, and a yard of interfacing. I recommend Pellon Shapeflex SF-101.

    The Curvy Clutch Tutorial and Pattern

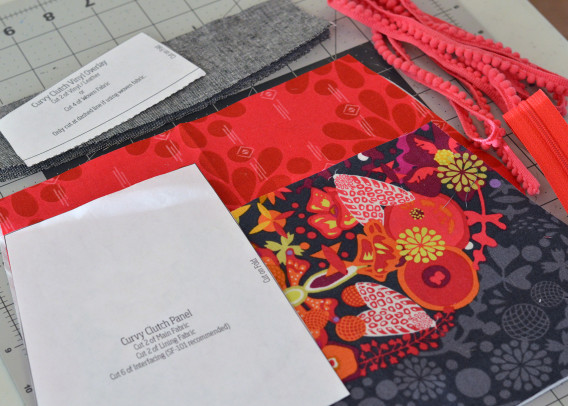
    1. Cut all your pattern pieces for the Curvy Clutch as directed on the templates. Trim your zipper to 7″ in total length. Be sure not to cut off the pull.

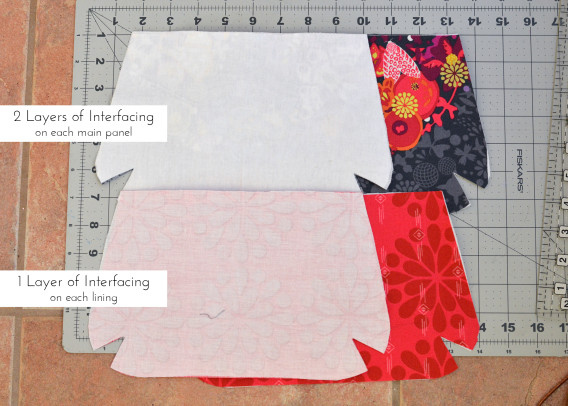
    2. Take two pieces of your interfacing, making sure rough side facing up, and layer with under one main panel. Follow manufacturere’s directions for fusing. Repeat for other main panel. Fuse one piece of interfacing to each lining piece, following manufacturer’s directions. Set aside.

    The Curvy Clutch Tutorial and Pattern

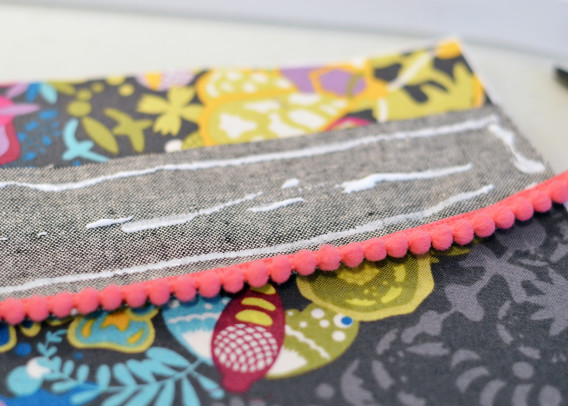
    3. Take your accent pieces, and put them RST. Using a 1/4” seam allowance, sew along the curved edge, backstitching at both ends. Turn and fold the pieces, right sides now on the outside, and press carefully. Don’t stretch the fabric while pressing. If you’re using vinyl or leather, there will be no sewing on this step. Proceed to the next step.

    The Curvy Clutch Tutorial and Pattern

    4. Take your accent pieces and your trim, and then apply a thin layer of glue to the wrong side of your accent piece on the sewn edge. You’ll need to make sure your trim stays in place so hand press the trim well.

    The Curvy Clutch Pattern and Tutorial

    5. Once your trim is adhered, go ahead and apply some glue to the wrong side of the accent piece.

    Alternately, you can lay the accent piece on the main panel, aligning top edges, and pin well. I don’t recommend pinning if you’re using vinyl or leather, as it will leave permanent holes.

    The Curvy Clutch Pattern and Tutorial

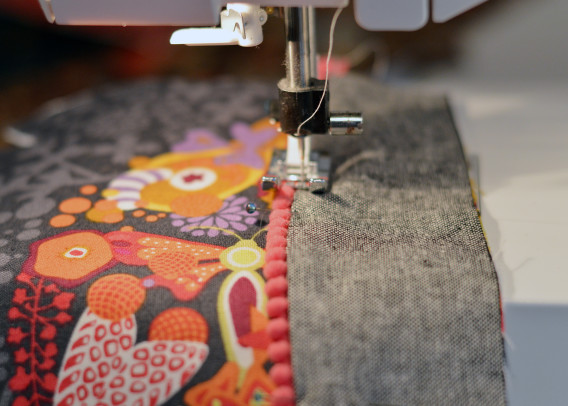
    6. Now, very carefully as not to snag and pull your trim, topstitch 1/8” from the edge of the accent piece to secure the accent piece and trim to your main panel. Sew around all four edges. Set aside.

    The Curvy Clutch Pattern and Tutorial

    7. Grab your zipper tab, and iron it in half, lengthwise. You should have tab that now measures 1” wide by 4” long. Open it and fold the outside edges to the middle. Press again. It will look similar to bias tape. Once pressed, open and insert your trimmed zipper edge, aligning it with the middle of the tab. Topstitch this tab, and trim leaving 1/8” extending past zipper. Repeat for other side of zipper.

    With your zipper pull on the left side (for now), apply a thin layer of glue to zipper edge, on the bottom of the zipper.

    The Curvy Clutch Pattern and Tutorial

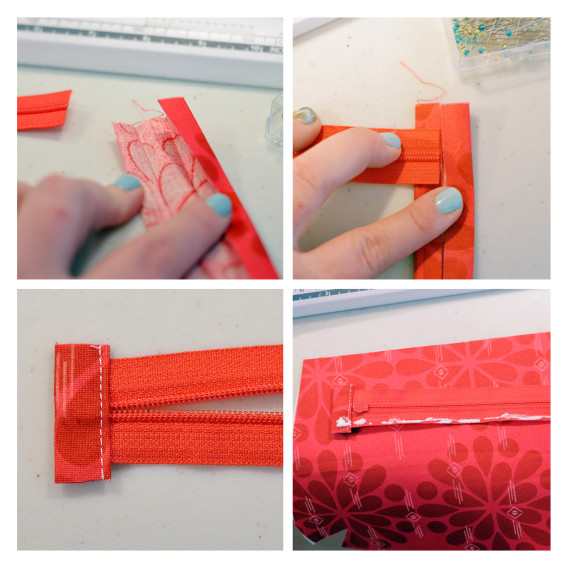
    8. Center your zipper on the right side of the back lining panel. Hand press to adhere zipper. This will help keep zipper in place. Place your back main panel right side down, centered on the zipper, and aligning top edges.. Pin well.

    Note that the zipper pull is still on the left side. In the picture, my zipper is open so that I can easily sew this seam. Sew with a 1/4” seam allowance to finish making the back of your clutch.

    The Curvy Clutch Pattern and Tutorial

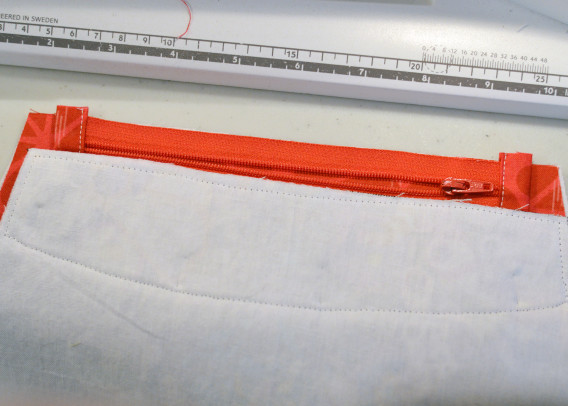
    9. Press both the lining and main panels away from the zipper, and topstitch the edge as shown. I use a 1/8” seam allowance for topstitching.

    The Curvy Clutch Pattern and Tutorial

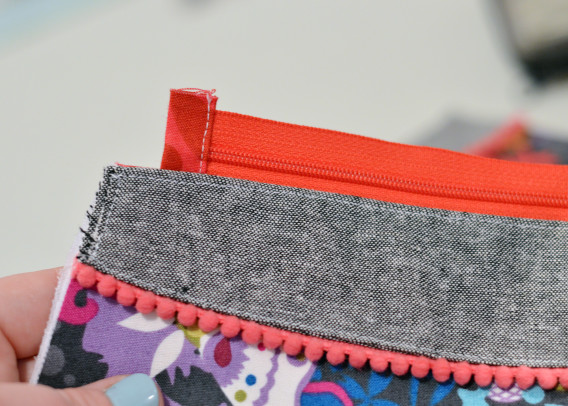
    10. Repeat steps 7 and 8 for the front main panel and lining of the clutch.

    The Curvy Clutch Pattern and Tutorial

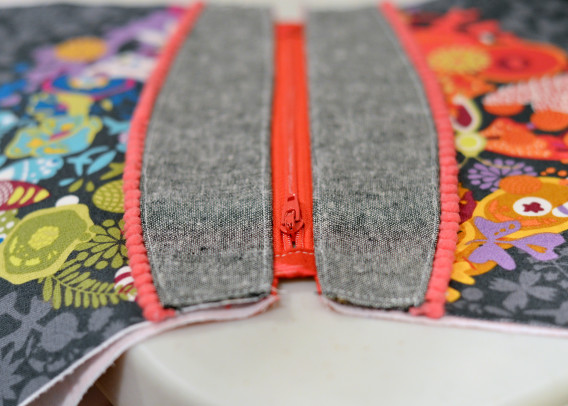
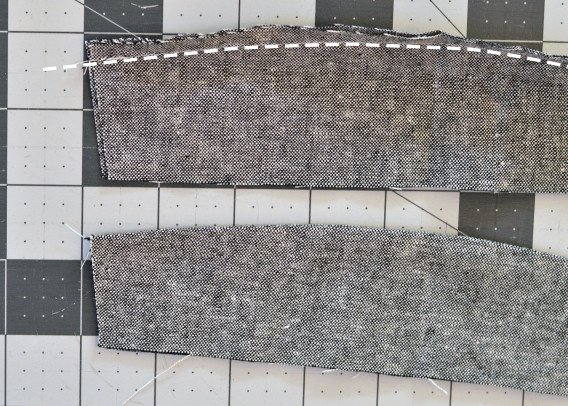
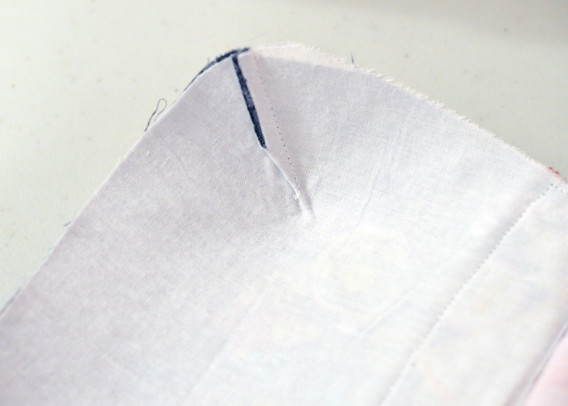
    11. In this step, you’ll sew together the darts, which create the curved bottom. Fold your main and lining panels RST and sew with a 1/4” seam allowance. Press seams toward the middle of the pouch.

    The Curvy Clutch Pattern and Tutorial

    12. OPEN YOUR ZIPPER!

    OPEN YOUR ZIPPER!

    DON’T FORGET TO OPEN YOUR ZIPPER!

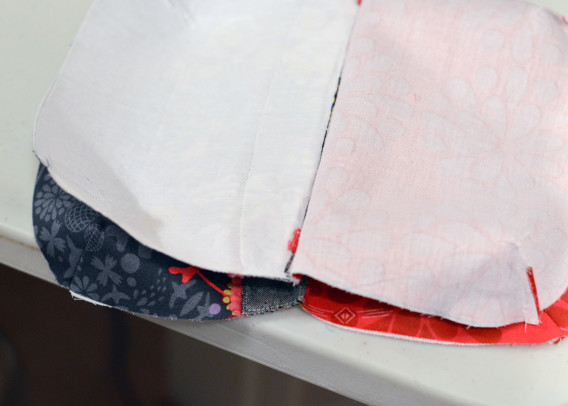
    Align your two main panels RST. Align your lining panels RST. Pin well. Leaving a 4” opening on the bottom edge of the lining, begin sewing your clutch together. Go slowly over the seams and when you get back to the lining opening, backstitch several times to reinforce.

    The Curvy Clutch Pattern and Tutorial

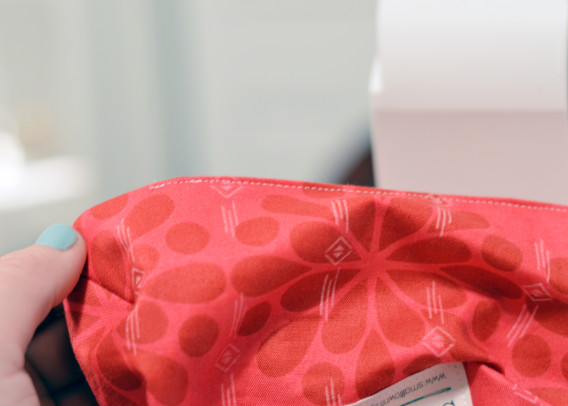
    13. Using the lining opening, reach into the hole and through the open zipper, turn your pouch right side out. While the lining is still out, sew the opening closed either by hand, or machine.

    The Curvy Clutch Pattern and Tutorial

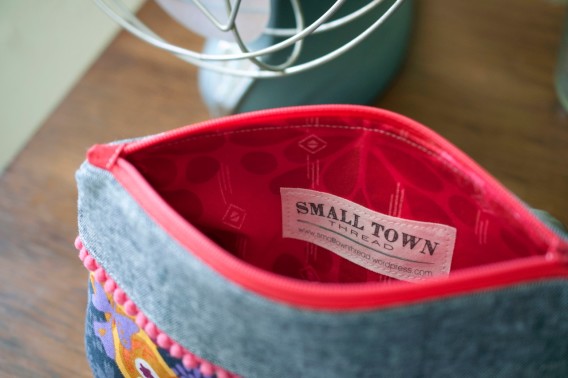
    14. Push the lining back into the clutch, and press well. If you have used leather or vinyl, please don’t use the hottest setting on your iron as it will damage your clutch.  That’s it! You’ve completed your Curvy Clutch.

    Share photos on Instagram using #TheCurvyClutch and #SewingWithPinkDoor

    The Curvy Clutch Pattern and Tutorial

    15 Comments »

    06 Jan

    It’s time to clean out my desk – Nesting Boxes to the Rescue!

    Posted under New Fabrics, News, Reviews, Selfish Sewing, Tutorials

    Hi All!

    It’s been a busy first week of the New Year around here! Anyone else agree? I’ve been on this binge to completely purge my house (I do this often – don’t ask!) and I started in my sewing room. My desk…this big heavy metal beast of a desk, well, it needs to go. I have already procured a replacement from a friend of mine. The new desk is a beautiful old wooden desk from the local Holy Cross Abbey. It was one that the monks used fifty years ago. Can we say exciting!? I do need to sand it down a bit and refinish the top as it’s a little rough for fabric, but it’s otherwise in fabulous condition! I also need to disassemble it so I can bring it down to the basement, eventually. 😉 But anyways, in hopes of kicking off my new storage solution and work area, I created some fun little nesting boxes for my desk! You can find the pattern here and it seriously, took me no more than 3-4 hours to do them all! SO SO EASY!

    Pink Door Fabrics - Nesting Boxes, Storage, Desk Organization, Sewing Organization, Notions

    I contacted Jennifer at Monaluna Design for the absolutely GORGEOUS fabric, and in case you’re curious, it’s called Westwood. You can find some for yourself here and I promise, you won’t regret it. It’s a lovely fabric made with Organic Cotton and the drape is amazing. It’s most similar in feel to Art Gallery Fabrics, but a little thicker. Not much! The colors are so very me! I especially LOVE LOVE LOVE the Deerheart print! Stay tuned for a project made with that.
    ++ Note: We are currently OUT of the Llama Love but will be getting more soon! ++

    DSC_1711 copy

    The pattern includes directions for four (4) different size boxes. There’s a small (3″ x 4″ x 2″), medium (3″ x 8″ x 2″), and large (6-1/2″ x 8-1/2″ x 2″) and with their 2″ height, they are PERFECT for inside drawers! The pattern calls for Fast 2 Fuse interfacing, but suggests that Peltex 72F will work too. I only had Peltex 71F, meaning it’s fusible on one side one, so I used Pellon Wonder Under to make the second side fusible. Works like a charm! I do recommend using a heavyweight interfacing for the nesting boxes as they are meant to be sturdy. Pellon DecorBond or similar will make for floppy boxes, and that’s definitely not the look I was going for.

    DSC_1716 copy

    The patterns was well written, and easy to follow. There are some diagrams to illustrate steps as you go and it’s seriously a very fast project! Like I said, I made all four in 3-4 hours with child interruptions (they’re ALWAYS hungry!) and picking up kids from school, etc. The only machine stitching you do, is while the nesting box is flat; there’s a bit of topstitching done. Otherwise, the pattern says to hand stitch the corners, but I rebelled and machine stitched mine. As long as you go slow, and take your time on that part, it can be done. Don’t worry about those pesky wrinkles you see (if you used Peltex 71/72F) as they’ll iron right out. I can’t say if that’s the case with the Fast 2 Fuse, as I didn’t have any to test out.

    Pink Door Fabrics - Nesting Boxes, Storage, Desk Organization, Sewing Organization, Notions

    Pink Door Fabrics - Nesting Boxes, Storage, Desk Organization, Sewing Organization, Notions

    As you can see here, the boxes all “nest” together, hence the name, Nesting Boxes. They’re really the perfect size for all your notions or threads, or even a pair of scissors and glue pen. You can also separate the boxes and use them individually however you’d like! The possibilities are endless!

    Pink Door Fabrics - Nesting Boxes, Storage, Desk Organization, Sewing Organization, Notions

    I definitely see myself making many more sets of these as gifts for my family and friends. Go get your pattern now and spend a few hours making them! You will not regret it!

    tags: , ,

    2 Comments »

    05 Nov

    Quilt Market – Fall 2014 [Part 2]

    Posted under Fall Quilt Market 2014, New Fabrics, News

    Welcome back! Are you ready for a picture overload? 😉

    Day 2 at Quilt Market was a busy day full of visual stimulation and oohing and awe-ing! We got to see all the new fabric collections in all their glory and can’t wait to show you! We got into the convention center at 9:30, and headed immediately for Starbucks to fuel us for the day, and then headed in. In case you’re curious, this place is HUGE. Like 28 rows of booths, and each row has 10-14 booths or so. I’d say the center was about as big as 4 football fields. I could be off on that, but it felt that big!

    We started off with Free Spirit. We got to check out the new line Flora, from Joel Dewberry, and then some lovely Feather Flock from Tina Givens. We also spied some Heather Bailey! We also checked out Tim Holtz‘s booth filled with all sorts of Eclectic Elements goodies and amazing eye candy! Ps-he’s really nice to talk to!

    quilt market 2

    quilt market 1

    We then checked out Amy Butler and Parson Gray’s booth! Amazing stuff I tell ya. Beautiful presentation and Amy Butler is SO NICE! She totally asked to take a picture with Nicole, since she was wearing a dress made with Amy’s older print. Chelsea and Charlie chatted with Heather Bailey about her new fabrics and products and we spied this ADORABLE little owl (pattern coming soon!).

    quilt market 3

    We of course couldn’t leave Free Spirit / Westminster without a group photo!

    IMG_4848

    We saw so much yummy Organic cotton options at Market – Monaluna, Birch, etc. Here’s Charley Harper Nurture – the penguins!!! (which will be arriving soon in our shop) as well as Monaluna Westwood which has the most amazing mustard and teal colors!

    quilt market 5

    There was also plenty of bags and funky patterns to be found at Quilt Market too! We loved pretty much everything we saw. Here’s the Beatle Bag (on the left) by Abbey Lane Patterns, and the Itty Bitty Beatle Bag, too! So cute and amazing for storage of sewing notions or used as a first aid kit, or EPP storage, etc. The possibilities are endless.

    quilt market 4

    I made a stop at the Kokka Booth and found all sorts of adorable animals and cute accessories and notions! They never fail to amaze me! We will be carrying Kokka in our shop soon!

    quilt market 7

    Finally, we hit up the coveted and amazing Cotton + Steel booth to check out displays, and this AMAZING moto jacket made with their new Sparkle Canvas! Stunning!! Bespoke, is a new double gauze collection coming in January. We will also have this and it’s on presale now. :) 
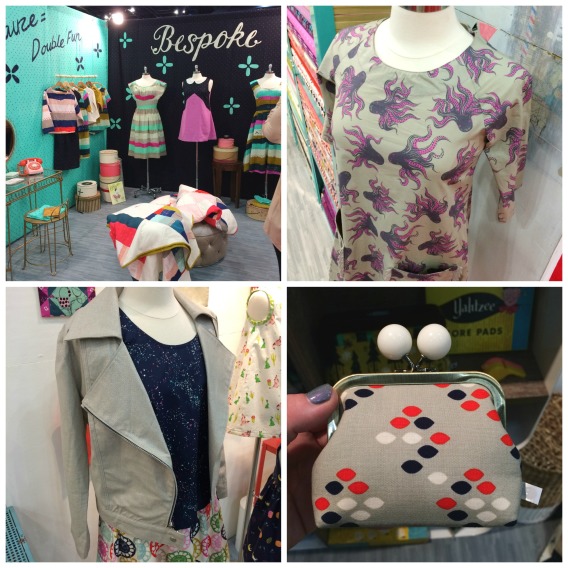
The Octopi Lawn is stunning in person and I imagine a whole wardrobe of Octopi in my closet.

    quilt market 8

    quilt market 9

    quilt market 10


    And that’s all for tonight. Stay tuned for Part 3 of Quilt Market, where we’ll show you even more photos and don’t forget, we’ll have a massive giveaway when we’re done!


    Blog Sig_Sandra

    No Comments »

    04 Nov

    Quilt Market – Fall 2014 [Part 1]

    Posted under Fall Quilt Market 2014, New Fabrics, News

    We had the wonderful opportunity to go to Quilt Market in Houston last month, and while totally jam-packed, we had a great time! Let’s not discuss how much we packed and brought with us, though, okay? 😉

    Pink Door Fabrics Crew

    Chelsea, Charlie, and Jamie flew in, while Sandra and Nicole took the long route and drove 15 hours, but we had plenty of extra space to pack in all the Sample Spree and Quilt Market goodies we got for the ride home. More on that in a bit. Texas, while beautiful, is a very, very boring drive. There wasn’t much to see like we had hoped, unless of course we were super into cotton fields. One thing we did notice, is that every single town and city along the way has ice cream shops, whether it be Dairy Queen or Braums. We never got to try it, so if you’ve had Braums, let me know how it is!

    On Friday morning, Oct, 24th, we arrived at Quilt Market and immediately had Schoolhouse classes scheduled for the entire day. The first session we attended was from Cotton + Steel. Here’s where they released their new fabric lines and discussed the inspiration behind their prints and then showed off a ton of quilts and projects.

    CottonAndSteelQuilts

    These ladies were so inspirational! They had a great back-story and all their new collections (Playful, Mesa, Mochi, Tokyo Train Ride, and Cookie Book) all work with their basics from the last collections. Fantastic, right? I’m super excited for these to ship in January! Pink Door Fabrics will definitely have the majority of the collections. In fact, they’re already up for presale and we’re working on getting more of it listed every day.

    Next, I went to a session on the Double Wedding Ring quilts, namely the ones done by Victoria Findlay Wolfe for her new book, Double Wedding Ring Quilts, due out soon! I am a HUGE fan of the DWR quilt and it’s more modern movement. I’ve seen some stunning use of negative space and modern color in a few of her quilts that I hope will inspire me to brave another for myself. She was an excellent speaker and I truly enjoyed meeting Victoria and hearing her fabulous discussion on how she creates each quilt and what inspires her.

    Victoria Findlay Wolfe - Double Wedding Ring

    Nicole, Jamie and Sandra went to a class by Sarah Lawson, also known as Sew Sweetness. She has amazing, and I mean truly amazing bags and patterns! She gave us some valuable information on the interfacings she uses and prefers along with some samples to help us remember what’s what. Sarah had a ton of bags with her that we got to check out and we also saw a few of her upcoming and new patterns. Stay tuned for those! They’re amazing!

    SewSweetness - Sarah Lawson

    Our last session of the day was the coveted Tula Pink Schoolhouse. We were anticipating this so much and incredibly excited to meet Tula Pink, herself. As a group, we are huge fans of her works and her fabrics. The originality in all her drawings is amazing, and when she shows her process on her Instagram or Facebook pages, I’m in awe. She really is incredible. After hearing her speak, she’s also quite hilarious and entertaining. Tula has such a bubbly personality! Anyways, she showed off her new line Elizabeth, coming out early next year. It’s beautiful, as usual!

    Tula Pink Schoolhouse

    Here’s an excerpt from her Elizabeth mini catalog describing the major drawings in her line and how they relate–

    IMG_5346

    After Tula’s sessions, we got a photo with her for wearing our Tula Pink – Downtown Housewife collab shirts.

    Ps- we totally scored these limited edition, VERY RARE, Tula Pink Elizabeth playing cards. There’s only 250 sets available and they’re signed and numbered by Tula Pink herself. We each got one set! We’re pretty happy with that. :)

    Tula Pink 2

    Sample Spree

    After this session, we went and waiting in line for Sample Spree. We got there at 4:30…The doors open at 8pm. This picture was taken at 7pm, and there were a LOT more people after this. If you haven’t experience Sample Spree before, like myself, I would describe it as Black Friday x50… It’s chaos. It’s a whole lot of people running through the entrance doors (not joking, literally running) to make a mad dash to find the not-yet-released fabrics. From what I noticed, Cotton + Steel was very popular, as was Robert Kaufman and Art Gallery, but there were literally dozens of other tables set up and I didn’t even get to see them all!

    Sample Spree

    I have to admit, I think each and every one of us did some minor damage at Sample Spree. I was behaved and didn’t buy anything ‘just because’ and only got what I felt like I would use. We have some extra bundles we’ll be adding to our giveaway bundle here in a few days and we’ll also be auctioning off some of the bundles on Instagram. Keep watching our blog for more fun info, and lots of pictures of our experience with Quilt Market.

    Stay tuned for Part 2…


    Blog Sig_Sandra

    tags: , , , , , , , , , , ,

    No Comments »